Using google drive and other google services maybe convenient but google does not care about your data unless you pay them monthly. For the most part their services are not too expensive.
But if google drive goes down, all your backups and data are at risk.
The alternate to this is to store your data in your own hardware, this maybe even more risky if your careless but makes you responsible for your data.
There are already well made solutions for this sold as NAS from many storage hardware manufacturers who let you store your data locally and charge you for remote access, WD remote access is free afaik but they also have a paid tier for more features.
But if you want a setup thats almost totally open source then you should setup your own Nextcloud
Nextcloud
Nextcloud - Open source content collaboration platform
This service seems to be almost a perfect replacement for most of the google services that I majorly use.
Their primary function is Cloud Storage but they also provide solutions that can replace your google chat and even google meet.
You can also replace all of google’s office clones with open source OnlyOffice that has seem-less integration with Nextcloud.
Base Setup
In order to set this up, you will need some basic hardware, and a lot of this setup can also be replicated to run on cloud providers.
Hardware Prerequisites
- An old mini PC or an old laptop for our compute.
If its just you that will be using this for just taking backups, this can also be a raspberrypi.
- Old Hard-disks or any other storage medium.
- Ideally hard wired ethernet connection to your switch/router.
Software Setup
Simplest way to set this up would be by using ubuntu and its snap store nextcloud option, you can find more on this setup here:
How To Install and Configure Nextcloud on Ubuntu 20.04 | DigitalOcean
But for our setup we will be using Docker so you can set this up on almost any other distro or even \windows \if thats something you really want, This will also make moving our entire nextcloud data to our external storage making it trivial for future compute upgrades if you end up using this more (you will).
- Setup docker on OS of choice, specifically Docker Engine
- **Make sure you have \*\*
docker compose\*\* as command.
**You can try running docker compose --help , if this command does not exist then follow
Storage setup using ZFS and Raid
For our example we will assume you have 2 storage disks connected to your server. To find what disks you want to use run sudo fdisk -l before and after you have plugged in your disks.
Install ZFS
For our example we will use ubuntu and so will use apt. use the equivalent for your distro, most other steps post this should be identical.
sudo apt update
sudo apt install zfsutils-linux
Check Available Disks
sudo fdisk -lLook for the devices that correspond to the disks you intend to use (e.g., **/dev/sda** and **/dev/sdb**).
Make sure these disks do not contain important data, as creating a ZFS pool will erase existing data on them.
\***\*Create the ZFS Pool\*\***
sudo zpool create nextcloudPool mirror /dev/sda /dev/sdbThis command creates a ZFS pool named **nextcloudPool** with two disks in a mirrored configuration, providing redundancy.
/dev/sda and /dev/sdb are examples from before, but if you dont have any other external disks connected then they will show up with these names too.
Create a ZFS Dataset
Not absolutely needed but just good practice to do this.
sudo zfs create nextcloudPool/data\***\*Set Mount Point\*\***
To now mount this pool to a folder we will use zfs set so it handles auto mount on boot etc for us.
sudo zfs set mountpoint=/mnt/nextcloud nextcloudPool/dataNow any files that we store in /mnt/nextcloud will be stored in our zfs pool. You can confirm this by running df -h /mnt/nextcloud and see if this matches the storage space on one of your device.
ZFS by default will mirror your smaller disk, if you have one disk bigger and one smaller, the above df will show you free space as the space in the smaller disk, as this config is safer for data integrity and redundancy. You can also override this behaviour if you personally are not worried about disk corruption, but I will not cover that here.
So ideally if you plugged in two disks of each 1TB you should now see around 1TB of free space when you run df.
\***\*Verify Pool Status\*\***
Finally, verify the status of your ZFS pool to ensure everything is working as expected.
sudo zpool status nextcloudPoolSetup Nextcloud with Docker Compose
Docker compose allows us to setup our docker containers and their connection all from a single config file, this is very useful if you ever need to move your server and need to setup this service again.
Create a file called docker-compose.yml, and paste the below into it.
version: '3'

services:
  db:
    image: mariadb:10.6
    restart: always
    networks:
      - cloudnet
    volumes:
      - /mnt/nextcloud/db_data:/var/lib/mysql
    environment:
      - MYSQL_RANDOM_ROOT_PASSWORD=true
      - MYSQL_PASSWORD=mysql
      - MYSQL_DATABASE=nextcloud
      - MYSQL_USER=nextcloud

  redis:
    image: redis:alpine
    restart: always
    networks:
      - cloudnet

  nextcloud:
    image: nextcloud:latest
    restart: always
    networks:
      - cloudnet
    ports:
      - 80:80
    volumes:
      - /mnt/nextcloud/nc_data:/var/www/html
    environment:
      - VIRTUAL_HOST=cloud.example.com
      - NEXTCLOUD_DATA_DIR=/var/www/html/data
      - PHP_MEMORY_LIMIT=10G
      - PHP_UPLOAD_LIMIT=102400M
      - MYSQL_PASSWORD=mysql
      - MYSQL_DATABASE=nextcloud
      - MYSQL_USER=nextcloud
      - MYSQL_HOST=db
      - REDIS_HOST=redis
    depends_on:
      - db
      - redis

networks:
  cloudnet:
    name: cloudnet
    driver: bridge
Better to keep this file in some place where you can go back to when you need to restart the containers or update them. I personally created a dir in my home dir called services/nextcloud/ with just this one file in it.
Run docker compose
Make sure you are in the same directory that the docker-compose.yml file exists and then run this:
docker compose -up -dThis should bring up all both your db and nextcloud container, and -d is to detach from the containers console.
You can confirm that both containers are up by running docker ps if they dont show up here something broke, comment below and ill try to help out, but also try and google this as nextcloud issues are better documented than their setup guides for docker.
Once you have successfully got that working your nextcloud should be running on port 80
Nextcloud background cron job setup
Nextcloud needs to run some jobs periodically to make sure its scanned all latest files etc, if you dont set this up nextcloud may not work properly and it will make sure to remind you all the time here
sudo su
crontab -e
An editor will open up, now paste the line:
*/5 * * * * docker exec -u www-data <container-name> php cron.phpIn the above command make sure to replace the <container-name> with your actual nextcloud container name that you see in the name column when you run docker ps, it will usually look like nextcloud-1 or dir_name-nextcloud-1 if you keep your docker compose file inside a dir named nextcloud then your container name would be nextcloud-nextcloud-1 .
Save and quit the editor, if your in vim use :wq to save and quit, and ctl+x then y if you are in nano.
This is it for the most part, now you can go to your nextcloud client at port 80 on your server’s ip.
Once you open that on your browser, it should look like this
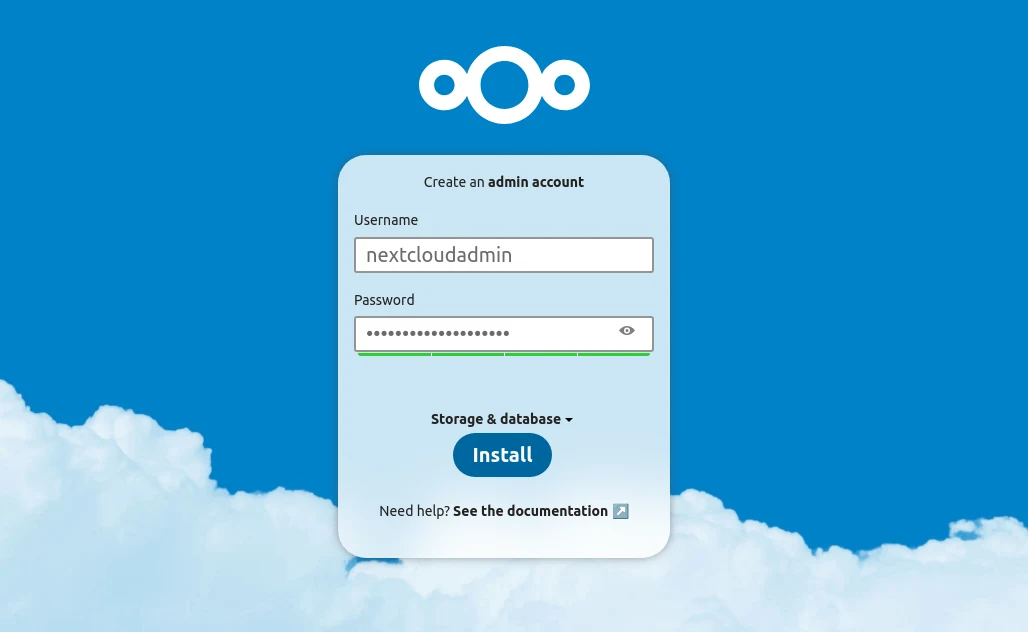
Once created you will be taken to your admin account. if not you maybe also taken to a page like this:
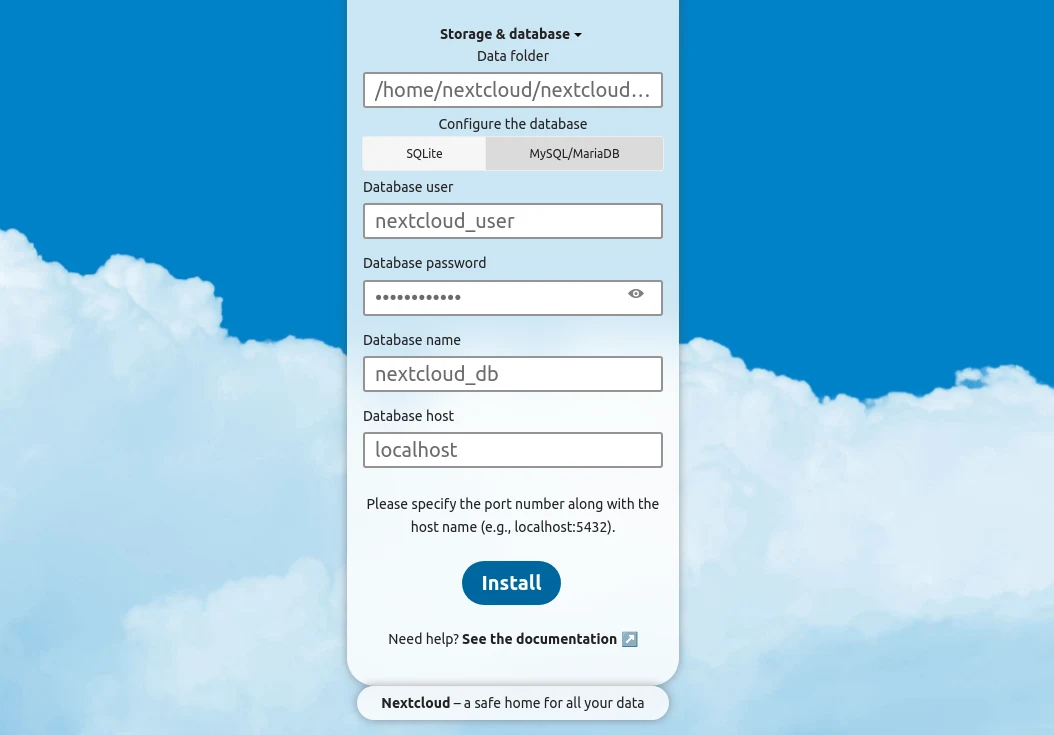
If you see this page, then try passing in the database credentials from the docker-compose.yml above and use the database host value as db if not already filled in.
Ideally this should not show up if it does there was an issue with the docker network connectivity between the nextcloud container and the db container, this could happen on windows, if you are stuck here on ubuntu, comment below and I will try helping you.
Post login setup
1. Confirm background jobs work
After login go to admin settings by clicking on your profile icon and select the basic settings from the side nav.
Here make sure that background jobs has Cron selected and is not showing any warnings above.

Your nextcloud will not initially look like the above in terms of color and background. You can personalise nextcloud to whatever brand you want. Check their Theming settings from the side panel to know more.
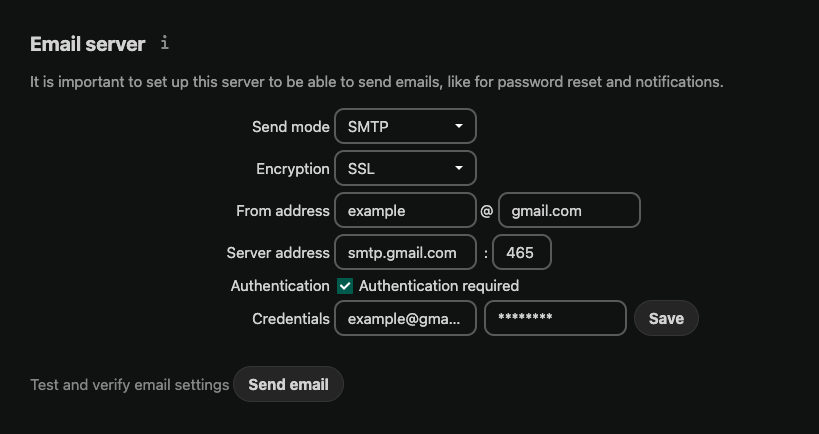
2. Setup Email server
This is useful if any of the users on your nextcloud forget their password and the server can also mail users about notifications similar to how google drive does when someone shares you a file etc.
Follow the below to create an app password in a gmail account that you created for this server
Accessing a Gmail Account from Nextcloud | Knowledgebase | Spry Servers
Now you can use the generated password in your nextcloud basic settings, username here will just be the actual email of the google account.
Once done you can explore nextcloud, create non admin users for yourself etc
Nextcloud also has native clients for most platforms that you can use to setup auto uploads
Download and install Nextcloud
Remote access your Nextcloud server
Simplest way you can do this is by just using Cloudflare Tunnels, this will need you to have a domain and move it to cloudflare.
Change your nameservers (Full setup) · Cloudflare DNS docs
And you can then setup a tunnel that can forward all traffic from one of your subdomains to the port 80 where your service is running.
Conclusion
The simplest next step to extend your existing nextcloud can be simple as going to apps and installing Talk, this will basically replace your google chat.
There are infinitely more nextcloud integrations like password managers and notes clients that look amazing, so explore and you can almost always something that can easily replace whatever service you are paying for with your data.